How to Speed Up Windows 10/7 Using ReadyBoost and USB Drive
If your computer is displaying a sluggish behavior and requires to get a boost up, then you can use the inbuilt tool of Windows to increase its speed. Read the complete article to know the ways to use ReadyBoost and USB drive to enhance the performance of the system.
ReadyBoost is a wonderful system tool which can utilize extra space to speed up Windows. It was introduced with the release of Windows Vista, and now available for Windows 7/8/10 as well. It is widely used as a special disk cache service. So, if your PC is running slow, then you can use ReadyBoost to acquire a new speed of the computer, instead of resorting to PC optimizing tools. Before getting started with applying ReadyBoost for your PC, it is necessary to know about it completely. In this article, you will read about ReadyBoost, its features and method to use it.
What is ReadyBoost
ReadyBoost is an amazing feature added by Microsoft which is helpful to boost up the slow running hard drive. It takes the help of easily removable devices, like USB Flash drives, SD cards, CF cards, Secure Digital and CompactFlash memory card, to complete these tasks. You can use this feature when your PC does not have much RAM. It is able to read and write small files quickly.
It does not work with hard disk drive and hybrid hard drive (excluding SSD) because they take much more time to read the small files in comparison to the removable devices randomly. If you get an external hard drive to use ReadyBoost, then you will not get any reliable output. So, it is recommended to use quickly removable devices for obtaining a performance gain.
- Features of ReadyBoost
- ● ReadyBoost is helpful to provide RAM if there is very less space in hard drive and it is running slow.
- ● You can easily transfer and receive files and other data from the RAM using it.
- ● It is helpful for a computer having low RAM storage size.
- ● You can enhance its workability using a fast USB drive.
- ● It is also helpful for adding minor performance gain for a device having a large RAM storage size.
- ● The cache file created using ReadyBoost is secured with encryption. So, all your data is secured under the protective shield of Windows stored in the ReadyBoost drive. You can compress and decrypt the data to read it.
- ● You can easily and quickly launch the applications on the computer with the help of ReadyBoost.
So, you can use this feature of Windows 10/7 to obtain a high-performance to smoothen the running ability of the computer. You can observe the changes well while using applications like Adobe Photoshop, Lightroom, Outlook and many other disk-intensive programs. Before going towards the way to use this feature, you should know about the prerequisite elements which can help you to use ReadyBoost in a reliable manner.
Pro tips: Good performance of PC will also help users avoid mistaken operation, such as deleting important files accidentally. In case it happens to you, just have a free try with iReparo PC Data Recovery Software to recover lost data from SD card, hard disk drive, or USB flash stick.
Requirements and Limitations of ReadyBoost in Windows
ReadyBoost can’t be used in every situation and is not capable to render a definite output. Learn about its requirements and limitations from these mentioned points.
- Not all kinds of USB ports are ready for ReadyBoost. You can use USB 2.0 or faster standards to use it. The faster the port, the better the performance.
- A USB stick or a memory card with at least 250 MB disk space is required for using it. You can take a memory disk with three times more disk space for a good output. The speed taken by the memory card to read the data should be at least 2.5 MB/second and to write the data to be at least 1.75 MB/second. Apart from all these, its access time should under 1 millisecond. You need not to worry about the calculation of these data. These data are calculated automatically by Windows when it checks the performance of the removable devices.
- You can use up to 6 GB of storage space for using ReadyBoost for FAT32 file system devices and the 32-bit version of Windows of any compatible version. If you are working with a FAT16 file system, then this cache size gets reduced to 2 GB.
For exFAT file system devices and the 64-bit version of Windows, the cache size is relatively very higher. You can easily create a maximum size if 32 GB on a single NTFS- formatted removable drive.
If you want to increase the cache size for the FAT16 and FAT32 file system devices then you need to convert these file systems to NTFS file system. You can do it easily without any loss by learning about disk management for Windows PC.
- You can use only one drive at a time for Windows Vista. However, it is not the same case for Windows 7, 8/8.1 and 10. Windows allows its user to combine up to 8 different fast-removable devices for the creation of cache. So, you can create a size of a maximum of 256 GB using ReadyBoost on Windows PC.
- You have to be alert and careful while using the drive for the ReadyBoost as it may end up with many errors like app crashing, files not found, the program not found and others. Eject and disconnect the hard drive properly by taking the required precautions.
- You can’t use ReadyBoost for a PC working on Solid State Drive. You will receive a message on the screen as “ReadyBoost is not enabled because this computer is fast enough that ReadyBoost is unlikely to provide additional benefit”.
- It does not play any role in speeding up the processors or RAM.
- If the WEI subscore of the primary hard disk is low then you can acquire more performance gain by using
ReadyBoost. You can’t calculate WEI i.e., Windows Experience Index for Windows 8.1 and 10.
How ReadyBoost Works
ReadyBoost provides a temporary drive space to store data using an external drive or media. It works with the help of SuperFetch, a disk cache management system, which is helpful in improving the speed of the system. SuperFetch was also introduced with the release of Windows Vista. It is a modified version of PreFetcher which was available for Windows XP.
SuperFetch checks all the data and its usage on the system and the loading of data on RAM memory accordingly. The highly used application or program is loaded on RAM to enhance the time taken for launching the program.
In this way, a chance is created by SuperFetch for some time on the main memory (RAM). This helps the system to gain a performance even with a low RAM.
Superfetch plays an important role in analyzing the system data and its uses. It selects the data or application which needs to get transferred USB drive to speed up the Windows. You can find all the data copied to the cache file and stored in the folder of the USB drive by Superfetch. This process occurs only in the case of non-sequential operations.
Tips: Superfetch could also cause high disk usage on Windows computer, but there is an easy method to fix service host Superfetch 100 disk usage in Windows 10.
Superfetch takes the file and copy it to the hard drive in case of sequential operations. So, ReadyBoost does not play any role in the transfer of data or storage of data. After the data is stored in the temporarily created drive, ReadyBoost helps the system to speed up its workability and improve the performance. You can enable and disable this feature anytime you want.
How to Use ReadyBoost to Speed up Windows 10
You have already read about the requirements of ReadyBoost. You can use a fast-removable device like USB drive, SD card or a CF card to use it. For using SD card, usage of the inbuilt SD card reader of the computer is recommended for an effective result. The external card reader is not much productive as the internal one. Moreover, you can format your USB drive or SD card before using for a good result.
Now, go through the steps carefully for setting the ReadyBoost to speed up the Windows 10.
- Open your Windows 10 PC and connect the USB drive or any other removable device to it.
- Click on My Computer or This PC and then right click on the USB drive.
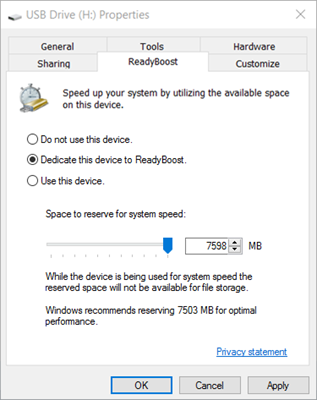
- You will get a menu from which select Properties and go to ReadyBoost tab. Select “Dedicate this device to ReadyBoost” or “Use this device” and adjust the space for system speed as per your requirement using the slider. You can also use the complete space of the connected drive if you want. If you select dedicate this device to ReadyBoost then you will not be able to use that connected USB drive for any other type of storage.
- Now, click on “OK”. Wait till the Windows configure the USB drive.
In this way, you can use this wonderful feature for boosting the performance of your Windows 10 PC.
How to disable ReadyBoost
You can use ReadyBoost for a better performance of your PC without any loss. However, in case you don’t want to use it any longer, then you can disable it by following these steps.
- Connect the USB drive that you used to store the data.
- Now, click on My Computer > (Your USB drive)> Properties.
- Now, open the ReadyBoost tab, and then select Do not use this device and then click on OK.
- After this, go to the folder of the USB drive and delete all the files stored using ReadyBoost from there manually.
In this way, you can disable ReadyBoost on your device. You can enable this service anytime when you want.
How to monitor Windows 10 ReadyBoost
If you want to analyze the performance gain data and the improvement in the speed of the system because of ReadyBoost then you can do it using the Windows Performance Monitor. Follow these steps to enable this monitoring service for ReadyBoost on Windows 10.
- Open your computer and go to the Start menu. Now, search Performance Monitor using the search bar. Else, locate it by right clicking on This PC and then selecting Manage> Performance> Monitoring Tools> Performance Monitor.
- Now, on the Performance Monitor windows, click on Performance Monitor from the left side.
- Click on “+” option to add ReadyBoost for being monitored by this tool.
- A new Add Counters window will open on the screen from where you need to locate and select ReadyBoost Cache from the given list.
- Click on Add to add ReadyBoost to the list of other added counters.
- Now, saving it to Performance Monitor, click on Ok.
After adding ReadyBoost Cache to the Performance Monitor, you can easily check out analytics and statistics of Windows 10 ReadyBoost. You will not get a precise detail for the changes using it, but it is helpful to obtain an overview of the performance of the PC using ReadyBoost Cache.
Bottom Line
We have gone through a complete set of information about the ReadyBoost from this article. Now, you can easily use it and track its performance for speeding up the hard disk of the Windows Vista, 7, 8/8.1 and 10. Keep all the requirements and recommended to in mind for effective and better output. It is an excellent feature available in Windows PC for boosting up the storage system. So, speed up the Windows PC with a low RAM memory easily using ReadyBoost. If you have found this article useful to use ReadyBoost, then share with us through the comment section. You may also check out more tricks to speed up Windows 10.
