How to Increase Dedicated Video RAM (VRAM) on Windows 10 Laptop/PC Free
In every PC system, RAM plays a critical role in loading all the programs and execution of files at a much higher pace. That’s why most of the users are always very concerned about the RAM in their system. Fortunately, there is a separate slot available for the users in the Motherboard of every PC where they can insert a dedicated RAM chip to increase the RAM of their system, in case they have a low RAM left.

RAM is responsible for the loading speed of every program and file from the PC. Whenever a user wants to execute a program, then all the files get loaded on the RAM by the hard disk. That’s why a high-capacity RAM card is able to greatly speed up a Windows computer but so expensive. However, there is no need to purchase a high disk space memory if you want to increase the execution time of all the programs.
Why You Need to Increase Dedicated Video RAM
Getting a more RAM is a must to increase the execution time for sure, but as a regular user, you don’t need any individual or external RAM chip for your PC. The external RAM chip is required to those users who frequently plays high-quality graphics games on their PC. As we all know that if you want to get some good gaming experience on your PC, then two things are a must. The first thing is that you need to have a considerable amount of RAM in your PC so that the execution time becomes short as usual. The second thing here is that you should have high-quality graphics to experience a smooth gaming experience.
So, to get an excellent graphical performance of every PC game, you need to have enough Video RAM (VRAM). The VRAM is a specially reserved kind of memory for the gaming purpose so that the gamers will get high-quality graphics on their PC while playing customized games of higher disk space. VRAM is an extraordinary reserved memory which is better optimized than regular RAM.
If you increase the VRAM in your PC, then the extra load which was putting on the normal RAM will get removed. Therefore, it would be a good call to increase the VRAM in your PC if you are a dedicated gamer. VRAM will also help you improve the resolution of your screen to get some good gaming experiences. Basically, there are two ways in which any user can increase the VRAM on their PC without spending extra money:
- Increasing Dedicated VRAM in BIOS settings.
- Increasing Dedicated VRAM in Registry Editor.
We will discuss both these methods in details below. Follow every step carefully so that you may achieve the task much easier and hassle-free. Before we start with the two methods, first of all, you have to check the actual VRAM allocation in your PC. We will show you the steps on a Windows 10 laptop.
How to Check VRAM Allocation in Windows 10
- Click on the Start menu and hit the Settings option present on the bottom left side of the screen.
- Inside the Settings menu, go to System > Display.
- On the Display tab, scroll down and open Advanced display settings.
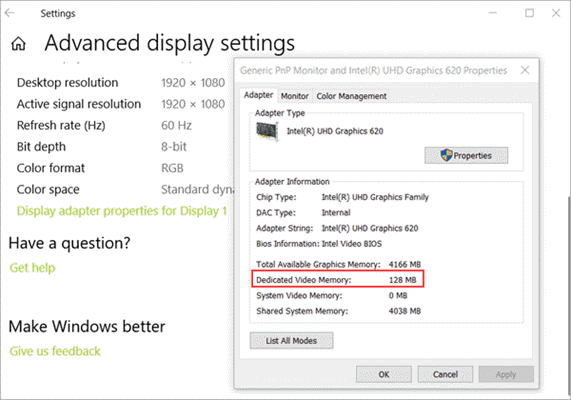
- On the new screen, click Display adaptor properties for Display 1.
- On the pop-up window, you will get all the detailed information about the amount of VRAM reserved on your PC.
Method 1. Increase Dedicated VRAM in BIOS Settings
The most frequently used method of increasing dedicated VRAM allocation in your PC is by using the BIOS settings. Though this method is not applicable on every motherboard, still you can try your luck so that it may produce some fruitful results. Follow these simple steps to get the task done using BIOS settings:
- Restart your PC and enter the BIOS menu by pressing F2, F5, F8 or Delete key repeatedly during the bootup.
- Inside the BIOS menu, you will get an option to enter into Advanced Settings.
- Open the menu similar to Graphics Settings, Video Settings or VGA Share Memory Size.
- Set the Pre-allocated VRAM a higher amount, like 512 MB.
- Restart your PC to apply the altered settings.
After rebooting, you will get some stunning high-quality graphics in the online PC games. As we already mentioned that changing VRAM amount by BIOS settings is not available for all PC. That’s why this method will depend on your PC and fortune as well.
Method 2. Increase Dedicated VRAM in Registry Editor
Note: The steps below only works for integrated GPUs from Intel.
This is another convenient method frequently used by Windows 10 users to increase dedicated VRAM in PC. Just follow these below steps to accomplish your task:
- Open the Run window by pressing the Windows key + R shortcut.
- Type regedit in the Run box and hit Enter. Click Yes if User Account Control pops up.
- On Registry Editor, go to HKEY_LOCAL_MACHINE\Software\Intel.
- Right-click on Intel, then choose New > Key, name it “CMM”.
- In GMM folder, right click on the space of the right pane, choose New > DWORD (32-bit) Value, name it “DedicatedSegmentSize”.
- Double click on DedicatedSegmentSize, then select Decimal under Base and change the Value data from 0 to 256.

- Restart your PC to see the applied settings.
Bonus tip: With more VRAM, you will enjoy the better gaming experience, which sometimes means many video recordings or screenshots of your performance. In case you lose precious recordings, don’t hesitate to use the best photo recovery software to recover photos and videos from hard drive, SD card or PC immediately.


Final Thoughts
In addition to VRAM, you can also get better gaming performance by upgrading the graphics driver. We hope that this guide has helped you to increase the VRAM amount on your PC. If not, then please ask us your query in the comments section below. We will try to reach you with the solution to your question as soon as possible.
