How to Reset Your MacBook & iMac without Losing Data or Privacy
While it is very easy to erase all your content and information from a Mac before selling it, it is very important to follow all the steps in this tutorial. Unlike formatting a Windows laptop, you may expose yourself to the possibility of identity theft if your MacBook is not reset properly.

One important thing to keep in mind when you are passing down an old Mac to someone else is that it is not only required for you to delete all your data but at the same time, you should also install a working macOS. Without the operating system, the future owner will not be able to use your Mac and they may complain to you about its nonfunctional nature. By following the following steps, you will be able to reset your Mac safely.
Complete Steps to Factory Reset Your Mac
Though it may seem to be challenging, resetting your Mac is not very difficult, especially if you follow the instructions below with high precision.
1. Backup Your Mac Hard Drive
When you reset your Mac or perform a factory reset on it, all the data will be completely removed from the device. Hence, it is vital for you to transfer the data from your old Mac to a new one. You can perform the step by using the Time Machine method with the help of which you can backup all your data from the old Mac as well as transfer it into your new device.
Another safety precaution you can take at this juncture is to make a clone of the entire hard drive just in case something goes wrong. There are many tools available for cloning your hard drive, few of the best available in the market are Carbon Copy Cloner as well as SuperDuper besides an additional hard drive. After you have cloned from your previous hard drive, you should be able to boot from the cloned external hard drive. The drive that you have cloned can also be recloned if you want to restore your Mac. On the other hand, you can use this cloned version to access the original files from your Mac on to your computer after the internal hard drive has been removed from the Mac.
Pro tips: In the worst case when your important files are lost due to the factory reset, you may have a free trial with iReparo Data Recovery Software to recover files even after reinstalling system.


2. Deactivate iTunes Account
You should make sure to deactivate your iTunes account from your old Mac as you would not want to give access to the new user of your Mac to your personal iTunes account. An iTunes account can only be linked up to 5 Macs. If you do not deactivate your iTunes, the new owner will be able to exploit your account while you lose the ability to use the account in your devices. The exact method for deactivating your iTunes account from Mac varies on different versions of iTunes.
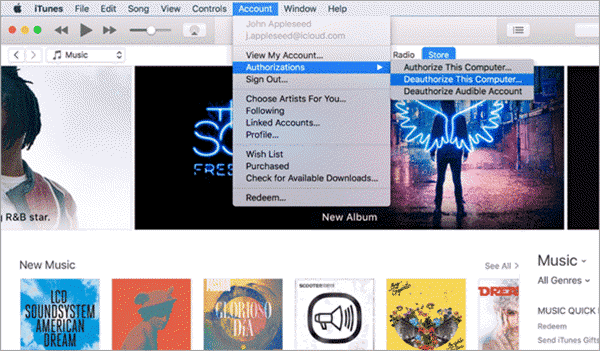
In the present version of iTunes, you simply need to open the application, click on Account > Authorization > De-authorise This Computer. After this, you will have to provide your iTunes password to complete the deactivation of your iTunes account from your old Mac.
3. Turn off FileVault
FileVault is the facility through which your data in the hard drive is encrypted and kept safe from outside invasion. Before you go any further down the steps, it is best for you to turn off FileVault. If you are worried about the security of your details since these data will soon be erased, security is not one of our concerns right now.
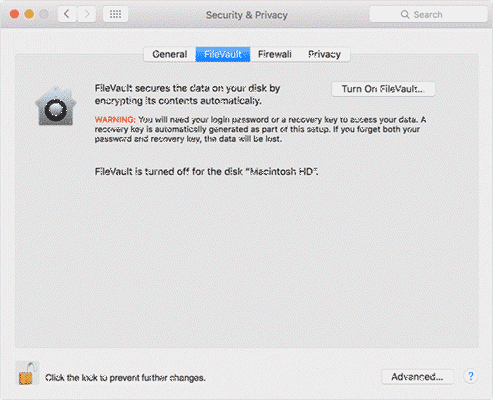
You can turn off FileVault, by first visiting the page “System Preferences,” then click on the option of “Security & Privacy”, this will take you to another page where you must select the FileVault tab. Check if the tab says “FileVault is turned off for the disc.” If you do not find such a thing written, click on the padlock icon that you will find on the bottom left half and click on “Unlock,” after having provided your Apple ID and password. Next, you must click on “Turn Off FileVault.” you will have to provide your Apple ID and password again, and the process might take some time for the decryption process to get over.
4. Disable iCloud Account
If you have created an original file on the Mac which is usually archived in your home folder, then you should remember to include it into your hard drive backup. After that, you can disable iCloud as follow:
- Open Apple menu in the upper-left corner, choose System Preferences…
- Click iCloud among the listed options.
- Click Sign Out button on the left side.
- You will be asked whether to keep a copy of iCloud data on the Mac. Untick all the items and proceed.
- A warning may pop-up telling you that the iCloud drive must finish updating before continuing with the Sign Out.
- If you are a possessor of MacBook Pro or MacBook Air with a touch ID, you will have to confirm, and your payment details have to be removed from the Mac. Signing out at this level will also remove all Apple Pay options.
- After this, you will need to provide the Mac with your Apple ID and your password.
Just wait for your process to complete now.
5. Restart Your Mac to Recovery Mode
Now that you have successfully backed up everything and disconnect your iCloud and iTunes accounts, you are ready to wipe off your Mac which should be done on the Recovery Mode.
- Click on the Apple logo, select Restart.
- Immediately hold down the Command + R keys until you see a spinning globe.
- It takes some time for your Mac to enter recovery mode. A Screen may then pop up asking you to select a certain language. The next scene that will come up is OS X Utilities.
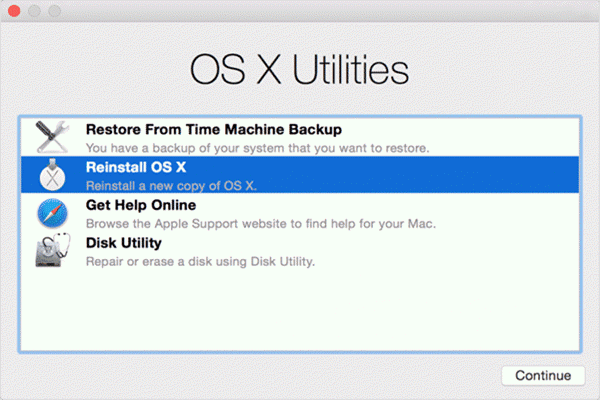
6. Now Erase The Drive of Your Mac
Confirm again if you’re ready to reset your Mac computer. Make sure that you have taken a backup of all the critical data that were previously in your Mac. Unless you make sure of this important data and content will permanently be removed from your possession, and you may never be able to find them back again.
- On Recovery mode, select Disk Utility and click on Continue.
- Select the main hard drive option, which is generally called Macintosh HD. Keep in mind that you are looking for the disk name and not the volume name that is intended underneath if it appears at all.
- Now click on the Erase button.
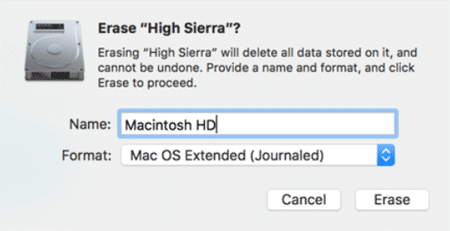
When you have completed the steps above, go to the menu button and select Disk Utility and then choose Quit Disk Utility.
7. Reinstall MacOS
Now that you have removed everything from your Mac, you need to make sure that it is ready for another person to use your Mac. You cannot sell your Mac without MacOS, and it is your responsibility to reinstall MacOS before you sell your device.
- Select on the option ‘Reinstall macOS’ or ‘Reinstall OS X’ from the options tab and click Continue to further your actions.
- Now you will be able to see a screen indicating that your Mac will automatically install the version of macOS your Mac was shipped with. Be sure of this and then Click Continue.
- Now you need to agree to the terms and conditions that are displayed by the program. Click Agree to proceed.
- There will be two options as locations for your software to install. You will now have to choose where you want to install the software, the best choice for this will be the Macintosh HD shown. Select it and then click on Install.
- Your Mac will now download as well as install a fresh and new copy of macOS. This step may take some time, so you have to be patient.
- MacOS will then restart when the installation of the OS is complete.
If you are selling your Mac to another person, it is advised that you do not enter any information beyond this level and let the new owner proceed with the information that he or she wishes to put forth.
A Quick Recap
In short, the following steps must be followed by you to reset your Mac:
- Make sure you are connected to a reliable internet connection so that you can safely reinstall the new MacOS into your Mac before passing it on to someone else.
- You will need to backup all your data and content, either with the help of the Time Machine tool or you may take the help of other tools like SuperDuper to transfer the data from the internal hard disk to an external hard disk.
- Make sure to deauthorize your iTunes account as it can only play on 5 Macs, and you do not want your buyer to get access to your paid account.
- Disable your iCloud account and sign out of it to start the Mac erasing process.
- You will now have to restart the Mac in Recovery Mode by holding on to a combination of keys. This step may be time-consuming, so be patient and hold onto the keys.
- Erase the hard disk of your Mac after making sure your files are backed up.
- Reinstall MacOS for the new user of your Mac.
With the help of a few steps, it is easy to return your Mac into its original state where it is safe to give your Mac to other people. Feel free to share your opinions or experience with us in the comment or share this tutorial to your social channels if you think it is helpful.
