How To Create a Bootable Pendrive or USB on Windows 10/8/7 Using CMD
Bootable pendrive is very useful when we need to install a new operating system on a Windows computer after system crash, virus attack or hard drive failure. In order to create a bootable pendrive, however, we usually need some third-party tools, like Win 32 Disk Imager, UNetBootin, Rufus, to start the process. Here is the problem: what if you don’t trust any of the bootable pendrive software downloaded from the network? Actually, you can also create a bootable USB using CMD, the in-built Windows Command Prompt utility.
What is a Bootable Pendrive?
Bootable pendrive, also known as bootable USB, is a disk drive that can boot your computer when it is no operating system. A bootable pendrive can also be used to boot a computer whose operating system has failed to work.
Tip: If you just don’t like the newly updated Windows version or build, then you can go back to an earlier build instead of applying the clean install with a bootable pendrive.
Before we embark on how to create a bootable pendrive using CMD, it is important that we learn about some common terms related to bootable USB flash drive.
Terms Related to Bootable USB
- Bootloader Options: The bootloader is responsible for loading the Operating System. Sometimes, you have a choice of selecting the bootloader when choosing the installation of a specific operating system.
- grub4dos: A bootloader package designed to allow users to select between multiple operating systems installed on a single system.
- syslinux: This is a light-weight bootloader package designed to allow users to select what type of or what operating systems are to be installed.
- QEMU Emulator: QEMU Emulator or Quick Emulator is a hardware virtualization tool that helps users test the booting capabilities of a drive.
- Cluster Size: The contiguous groups of sectors that are assigned by the file system are called as clusters.
- File System: It controls the accessibility of the data. This accessibility makes sure that the data is copied properly.
- Bad Sector: This is a bonus feature that some special bootable USB maker tools provide the users with. Here, the bootable drive is checked if there are any bad sectors or corrupted sub-partitions after the creation of a bootable USB.
It is important to know something about the terms in order to avoid possible errors occurring when you boot from a bootable USB drive.
How to Create a Bootable USB using CMD on Windows 10
Command Prompt is available on all Windows 10/8/7 computers, so you would not have to worry about downloading any new package or software to make your pendrive bootable. Nevertheless, you will need a USB flash drive and an ISO image file that contains Windows installation data for a clean install.
Note: Make sure to back up your USB stick to avoid data loss. Otherwise you may need to recover lost files from pendrive with a File Recovery Software.


Now, connect your USB drive to computer, then follow the steps below to create a bootable pendrive:
- Step 1. Click Start menu, type cmd and right click Command Prompt from the result, then choose Run as administrator.
- Step 2. Type the following commands one by one and hit Enter after each line.
- diskpart
- list disk
- select disk x (replace x with the number of your USB drive)
- clean
- create partition primary
- select partition 1
- format=fs NTFS quick
- active
- exit
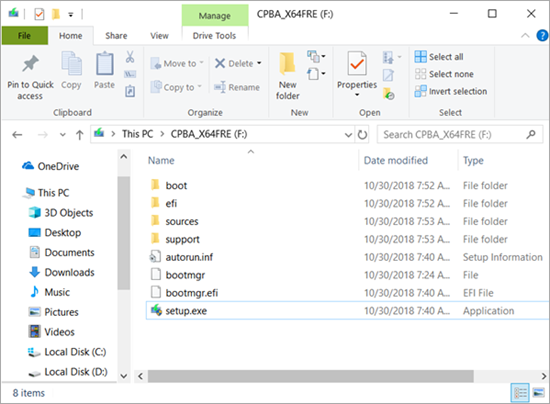
- Step 3. Now extract all the data from the ISO image file to the root of your USB flash drive.
After executing each command line, there will have instruction for the next step. Please check them careful, especially when selecting the right disk number.
How to Boot from a Bootable Pendrive
Since you have just created a bootable pendrive for your desired Windows version, now it’s time to boot it and install the operating system on your computer.
There are various ways to boot from a pendrive. Here are some of the options that are commonly used:
- When your computer starts after you have powered on, use function key (Generally F8/F12) to go into boot device selection. Just make sure to insert the pendrive before powering on the computer.
- The other method which was traditionally used was to change the boot device order from the BIOS menu. For this, you will have to go to BIOS settings (the ways vary on different computers) and change the boot order.
If you find important data lost after installing OS with the pendrive, please try this method to recover files after reinstalling Windows system.
Conclusion
We hope that we’ve cleared up any doubts you would have regarding creating a bootable pendrive with CMD (Windows Command Prompt) and installing a new operating system with it. If you find this post helpful, don’t hesitate to share it on your social network. It only takes you a moment but will benefit a lot of people continuously.
