How to Fix Preparing Automatic Repair Loop on Windows 10 in 2019
Before you’re landing on this article, your Windows 10 computer may have shown you the following error messages:
- Automatic Repair couldn’t repair your PC
- Your Computer or Window 10 couldn’t start correctly
- bootrec.exe /fixboot access denied
- Window 10 Automatic repairing failed
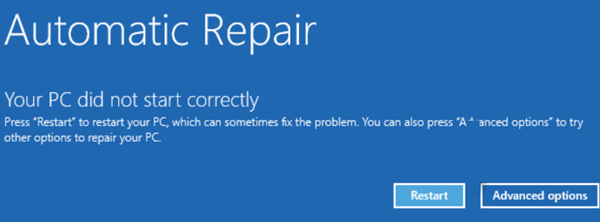
If you are unfamiliar with the automatic repair tool in Windows, it is necessary to read every word in this article before applying any of the solutions. Microsoft has designed this tool in such a way that it gets started automatically when the window faces the startup running problems. However, in many cases, the automatic repair falls into a loop and won’t boot the operating system successfully.
Generally, when you run this tool, you see a diagnostic window that shows you some messages such as your files, drivers, registers are missing or corrupted, which usually happen when your PC runs out of power, or crash due to memory issues and so on. So, in order to jump out from the loop, here are 5 methods that may help you fix failed automatic repair on Windows 10.
Method 1. Fix Windows 10 Automatic Repair Loop by Restarting PC
It is not a joke that a large portion of problems will disappear after rebooting the computer. Sometimes, Windows OS thinks that there is a severe problem with the PC, but in reality, it is not, and it gets stuck into the automatic repair loop. You can solve this problem with a simple restart. Do follow these simple steps for more assistance:
- Step 1. Restart your PC and continuously press F8 to open up the Windows Boot Manager.
- Step 2. Move the selection to Window 10 and press Enter.
Method 2. Disable Early-launch Anti-malware Protection
Sometimes, new installations of anti-virus or anti-malware protection can cause the automatic repair loop.
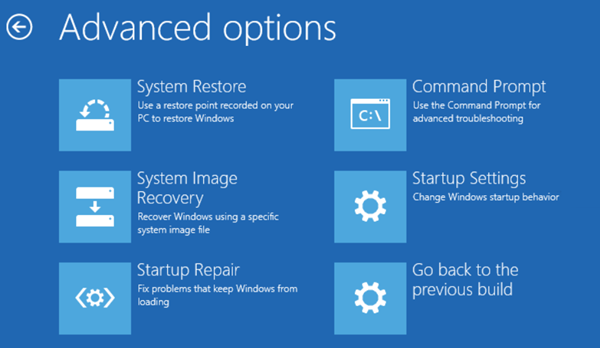
- Step 1. Select the Advanced options > Troubleshoot > Advanced options > Startup Settings.
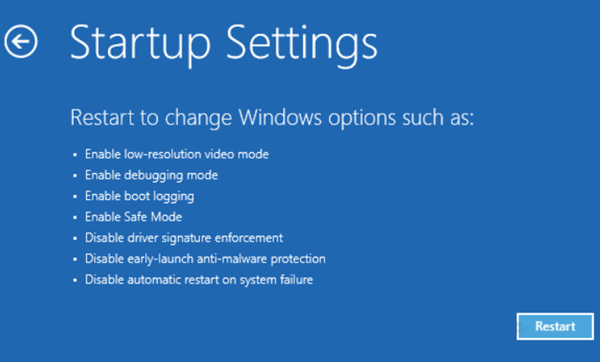
- Step 2. Click Restart, then choose “Disable early-launch anti-malware protection”.
- Step 3. Restart your PC again.
Method 3. Fix Windows 10 Automatic Repair Loop by Restoring Registry
Sometimes, the automatic repair loop problem can be the result of corrupted registry on your computer. You may see such type of message “Windows Automatic Repair couldn’t repair your PC”. You can also get out of this problem easily using the RegBack directory. Do follow the steps for further assistance:
- Step 1. Select the Advanced option > Troubleshoot > Advanced Options > Command Prompt.
- Step 2. Enter the command: c:windows\system32\config\RegBack* c:windows\system32\config;
- Step 3. It will ask you to overwrite the files, and you need to type All and hit Enter.
- Step 4. After that, type “exit” and hit Enter.
- Step 5. Restart your PC, and you will get out of automatic repair loop problem.
Method 4. Fix Windows 10 Automatic Repair Loop by Rebuilding BCD
If your Windows 10 computer is still stuck at Automatic Repair loop after the restart, it is possible that the boot files are missing or corrupted. Therefore, we need to rebuild the boot record using the Command Prompt utility.
Note: The modification could cause serious problems if it is incorrectly implemented. Follow the below steps at your own risk.
- Step 1. On the Automatic Repair screen, select Advanced option > Troubleshoot > Advanced Options > Command Prompt.
- Step 2. Enter the commands and hit Enter after every line:
- bootrec /fixmbr
- bootrec /fixboot
- bootrec /scanos
- bootrec /rebuildbcd
- Step 3. Type “exit” and restart your computer.
Method 5. Fix Windows 10 Automatic Repair Loop by Deleting Problematic Files
Specific corrupt files can also cause the automatic repair loop, but the question is how you indicate it. If you see a message, “Windows Automatic Repair couldn’t repair your PC” with log file “c /windows/system32/logfiles/srt/srttrail.txt” on your PC screen, that is the indicator of this situation.
- Step 1. Select Advanced option > Troubleshoot > Advanced Options > Command Prompt.
- Step 2. Enter the Command: C:\cd Windows\System32\LogFiles\Srt\SrtTrail.txt.
- Step 3. You will see the details that give you the name of the corrupted file along with the path, e.g. c: windows\system32\drivers\vsock.sys
- Step 4. Delete the corrupted file using del command. (e.g. c:windows\system32\drivers\del vsock.sys. )
- Step 5. Restart your Windows 10 computer and check if the problem has been fixed.
It is not necessary that vsock.sys file is corrupted. It may be other in your case. If you get the other file name instead of it, then check out whether it is system file or not. If it is a system file, then you shouldn’t delete it to avoid further system corruption.
Pro tip: In case none of the above methods works for you and you need to use your computer urgently, you can format your Windows PC, which will surely fix the issue. However, you may need to recover files after reinstalling system with the best data recovery software.


Conclusion
In this tutorial, we have introduced all 5 methods to fix Windows 10 preparing automatic repair loop error. It is impossible to say which method will fix the specific issue on your computer, but you’re suggested try from the first method until the last one. If one of the solutions works for you, don’t forget to let us and more people know.
